Showing posts with label Yuna. Show all posts

Monday, August 20, 2012

Final Fantasy x-2 recap


The x-2 costume was really fun and easy to wear. Making it was another story. Make-up was messed up in most of these pictures so excuse the fact i haven't had time to learn how to use photoshop and edit them... Lol. It was hot, and i was sweating.


The earring I reused from the x costume. The wig I ordered from cosplayandwig.com and had to put another layer of extensions in it because of everything listed in the yuna x post. I thought flipping it up would be easy but I should've done it before the day of the con because just using gel wasn't good enough.


The hood pattern we stole off of an old cape pattern that we had laying around and then altered it for size after it was on there. Bought a little snap to keep it onto my neck and then attached the tail to it.The tail I dyed when we were doing some of the rikku costume scarf stuff. I just stuck part of the canvas into the red dye and splashed it up with my gloved hand to make the gradient and then sewed it into a little pocket.


I hacked a pony tail sized extension off and folded it in half and put a rubber band around it and then electrical taped it to the tail itself. This was covered with the canvas and then tied with a piece of black string I had lying around. The actual tail was made out of a thick rope cut to size and a red ribbon. My friend braided it for me (because I got frustrated) off of a YouTube video.


The shirt I made by making pretty much a normal halter shirt and cutting a giant triangle down it. We then cut off the bottom piece from about the breasts down and sewed a ribbed material to it to give the illusion of a skinnier waist (cause what girl doesn't want that?) The zanarkand symbol was made with hot glue. We cut a triangle the size of the one in the shirt and drew the symbol to this scale. My boyfriend put a giant thick layer of hot glue built up on top of where the symbol would be and then we shaped it and smoothed it with a sodering iron and a scalpel. Painted it with black leather paint.


The shorts were just some short booty shorts that i got from jcpenny for like $13 bucks. The bag was made from a scrap of vinyl found at some fabric store because i couldn't find a suede piece the right color. It's tassels were actually a ribbon that i found at joannes. The silver things on the bag were pre-packaged at jo annes, but we drilled two little holes in them so that we could fasten the little turquoise bead. Then we cut off the bottom of some brads and glued those on the bag for the little buttons.


The skirt was made from a simple gradient die. Each strand (for the tie) is a piece of the same colored piece of fabric folded over with a zig zag stitch over top of it. Then we added lace to the white part of the bottom of each layer of the skirt. The boots were just boots i got from target, they happened to have a little strap over them but i figured it wasn't that big of a difference. :S


Then the guns... Lol. Guns were made out of wood. They were annoying. Azure found a tutorial on how to make them, and it basically consisted of finding a picture like this. I cut apart each piece separately and then my mom cut them all out (cause i shouldn't be allowed around power tools). We sanded a whole lot, and painted them :D. The designs on the side were just done with sharpie.

I think that's everything... ;>> if you need any help with anything and want to copy me on anything, feel free to message me on facebook (Sugar Blossom Cosplay) or shoot me an e-mail at Acronymsoup66@gmail.com.


Happy Cosplay! :D and here are some group pics to follow up the mini tutorial.


Feature Wakka and Tidus


Featuring Auron


Featuring cast of X and X-2. 

If you have any questions of any of the other characters in my group... Rikku, Paine, Gippal, Elma... I would be glad to get you in contact with the cosplayers, or i probably know myself. :D So feel free to message! :D 


Thursday, June 14, 2012

Skirt flowers down :D


Okayyy. Back to Final Fantasy ten now that i've-- made Gippal's Cloak, made Rikku's skirt, helped paine with her shawl thing (is that what that should be called?), headbands, um-- and everything else that doesn't make much sense when it comes to final fantasy ten. Mainly cause we're in an alternative reality right now-- nerd joke-- get it?


Momma got this embroidery machine for her birthday and it's seemed like a god blessing when it comes to this costume. Haven't seen anyone else do their flowers with an actual embroidery machine yet! It's a brother p770, and takes a lot of weird files and loads of fun complicated things.


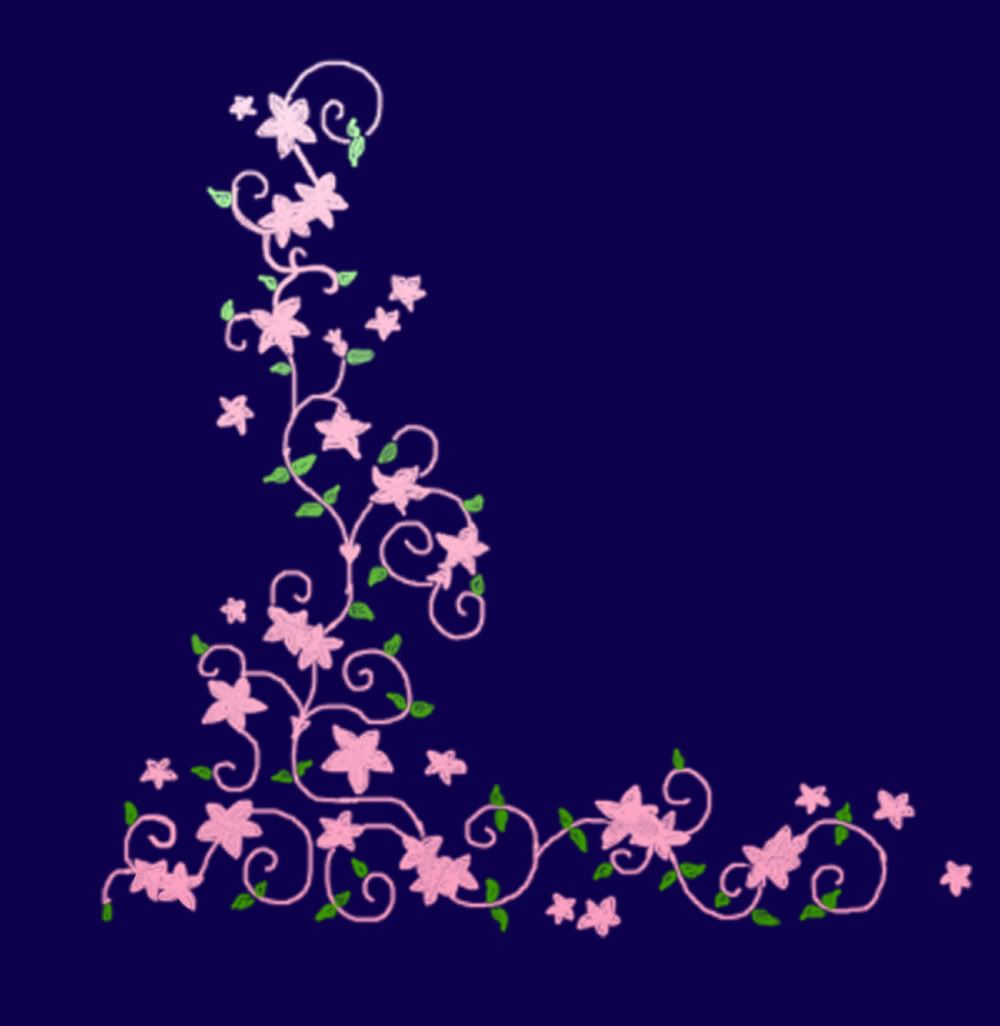
This is the pattern that we bought from an embroidery website (here.) We (mainly Niki actually), removed the leaves, re-colored the flower itself, and removed the happy holidays (Because the flower was supposed to be a Pointsetta-- though most Pointsetta's don't look like this). Wow that's a lot of parenthesis in a paragraph.


The flowers had to then be uploaded via a usb, and then put into the machine itself. We made three different sizes... Which i thought I had a picture of i guess i don't. There were three different sizes, and then I placed all the little flowers and pinned them to the skirt where I wanted mom to put them. She then embroidered the entire skirt for me :D


Here are all the flowers done. Now i'm working on getting my main artist over here to draw the scribbles on the skirt, which we'll do on a normal sewing machine, as per mom. Uhhh. I guess that's it? Sorry I don't have more pictures. Happy Cosplay! :D

I'll probably have a giant post soon about all the other costumes and their progress as per nobody uploads their blogs, though they are all authors on here-- <<;;;. Back to sewing!

Tuesday, May 22, 2012

A little less, but more than it was :D Yuna from X


Well, as promised. Here's the update on final fantasy X :D Whilst I am watching DBZ. Forgive me, because it is 5am here, and I am very sleepy, and however unenthusiastic i may sound, i promise that that is just my exhaustion :D


The Bow

Mom just about killed me for the perfectionism that revolved this bow. It was made 3 times? Maybe four. The first time it was too pointy, the second time it was too floppy, the third time i don't really remember, but this is the fourth attempt.

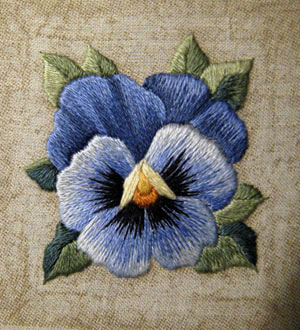
Granted, this bow isn't actually perfected nor sewed together, because it's still awaiting embroidery. However, until then this bow will remain pinned together. Speaking of embroidery, i was thinking of using a pansy as the flower part inspiration


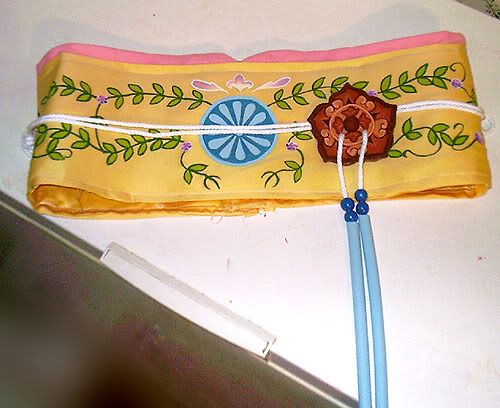
Something like this possibly? Less detailed and obviously smaller. For the leaves however, we're probably going to do most of it by hand. Placing the flowers with the embroidery sewing machine, and then connecting them with green thread with the normal sewing machine. I hope that makes sense. This is one example of an already embroidered obi, and i hope to turn mine into something like this one. No idea how to do the hibachi flower, or the circular pie pieces in the middle, or the faded petals... However, We'll try our hardest! And I think that it should work.

The Skirt


As you can see, the skirt's pleats have been ironed in. We're (me and mommy) having a hard time keeping them there. But we're going to wait till we get the embroidery into the skirt before we try drastically to force the suckers to stay in. 

Thinking of a couple different flowers for the embroidery on the skirt. Here is an example of what the flowers look like. As you can see, they're kind of stars. Thinking of using something like these, they're called Bauhinia. I'm also thinking of maybe using pointy Cherry blossoms.

I guess we'll see what happens, either way, i know it'll turn out amazing, especially considering these little details are going into it <3 I think this is one of the things I love the most about cosplay.

Things I have left to do:
Hibachi flower
Staff + Staff head (If you have a lazer saw, totally hit me up for a commish)
Fixing minor details on the sleeves that aren't really pictured here (ribbon, beads)
Embroidery obviously
Trying to get the pleats to stay
Um, uh, everything else :D

Until the finish, I'll keep ya'll posted. :D Happy Cosplay! 

Sunday, April 1, 2012

ToNs Of UpDaTeS!


There is so much to talk about guys! Cosplay wise we have added a Rikku, and an Elma (They came as a pair and I couldn't separate them ;] That was a joke, I promise). I have done tons of sanding as well as filling in with the guns. The head of my staff was cut out-- UGH! So much. I'll just walk you through it.

Rikku as Gabby H.
and
Elma as Niki's little sister, Anna I.


They're both awesome people. We're trying to figure out how to make both of their costumes the most cost efficient, because they're both-- well you know-- high schoolers-- and they're both sweet as georgia peaches. Now back to Yuna!

Me, acting all suave, blowing the dust off my guns and picking them up to begin working again. I totally want to take a pic like this when they're all done. :}

These are them, with a drawn on trigger, taped together with some great painters tape. As you can tell, they needed to be sanded, badly, and there are a few gabs between some of the different pieces that shouldn't be there. They should fit SNUGLY.


So, i bought some of this from the store, to repair some of the human error. It's stainable and paintable, and i figured it would have a more woody texture as opposed to something like clay. I wanted it to look like a solid piece after painting, and this helped to put together the cracks.


Me and Yuri (who was my helper throughout this whole thing-- and I THANK him for it profusely), used this dremel to help with the sanding part of the repair work. We took turns, diligently sanding. I tried to make the edges beveled so that the gun would have a more three dimensional shape, and look less like a bunch of wood pieces glued together.


Put the wood filler on, in great excess. And left both guns to dry propped up on the paint bottle which will soon be giving it it's life <3 They dried overnight,


And then we went back to sanding. Now the guns are on standby, as my mom attempts to figure out a method to cut out the trigger hole, as well as the "wheel" (as i call it), on the back. After that, they will be going back to being sanded-- which I am TOTALLY starting to resent.


With the guns on standby, we went to something else. This is actually a small version of the cut out. We went to kinkos in the middle of the night to get it blown up and re-sized, but they were going to charge us 15 dollars just for a blow up, which seemed ridiculous! Thankfully, with a little bit of Yuri's help, and some computer software, we ultimately got it blown up and printed on our own.


This is a picture of the two side by side. The stencil was cut out as well. The blue part, I was going to do by using probably some 8mm wood(?). I think that the wood for the staff head was about 16mm? Maybe just a little bit bigger. I was just going to paint it blue and then glue it on, we will see how things go.


My mom surprised me by cutting out my staff head while I was at work :}. It still needs more-- Sanding-- shivers-- but it's an overall awesome look, and it will be getting spray painted with multiple shades of gold, as well as some more surprises you followers are just going to have to wait and see!

As always, I will keep ya'll posted as more progressions are made on my costumes, as well as making some sort of, these are the things i still need lists (which is mostly small things, so i'm not too worried about it.)

Happy Cosplay! :D

Friday, March 30, 2012

Weapons-- Take 1


The thing that makes gunner yuna so awesome, is her guns. So today was attempt one at guns. I just got back from an oral surgeon which was the main reason I gave up for the day. Two stitches in my gums :{.


I was trying to make these. The tutorial is here. I bought 16 mm press board (I guess that's what it's called) from home depot, and then 6mm and 3mm craft wood from Micheal's (which by the way is awesome cut! and that part is not sarcastic).


So we started out well. Cutting out the patterns as the instructions instructed. After we were done with each step, the pattern slowly got progressively smaller. (I am totally not showing off my mustang on purpose-- maybe the boyfriend though).


The main body of the gun got placed on the 16mm board, and then traced. I tried to do super dark lines in order to help the person using the saw (I wasn't allowed).


I don't know if you can tell in this photo, but these are the two guns traced on the piece of board. The board was steadied with clamps so that we could begin the sawing!


This is my wonderful mother carving out some of the smaller pieces with her little scroll saw. I wasn't allowed to use them because I just got out of the oral surgeons and apparently am a little weird. Psh! At least I may get some saw time with my staff...


I stacked up a couple of the pieces as we went so that you could get a good view of the gun's building, as the pieces were coming hot off the press.


A bunch of the pieces waiting to be sanded. Have I ever mentioned how much I love my camera?


Me, my boyfriend, and daddy all sanded the pieces. Yuri is totally a perfectionist when it comes to these things.


The reason why this is part one is because, even though they were all done to pattern, there was just too much human error, and not all the pieces fit perfectly together. Working on the sanding is pain staking. :{ (If anyone has an automatic sander, I would LOVE to barrow it). It's also incredibly cold outside and I'm an 110 pound wimp. :}


Part one has been stored in a box in my closet, and it will be picked up soon... maybe even tonight-- if i can find a space heater. :D Happy Cosplay!